Memorable wallet addresses on your own domain
Written by Sid VishnoiWallet addresses are meant to be easy to remember or identify, unless your wallet provider chooses them for you. The address might include a long subdomain or even a random series of numbers and characters. But did you know that if you own a domain, you can set your wallet address to be the same as your domain?
So, instead of https://ilp.wallet.example/12345432/usd, you can have $mywebsite.com as your wallet address! Technically, wallet addresses with the $ are referred to as payment pointers and those starting with https:// are the actual Open Payment wallet addresses. However, we’ll use both terms interchangeably in this article.
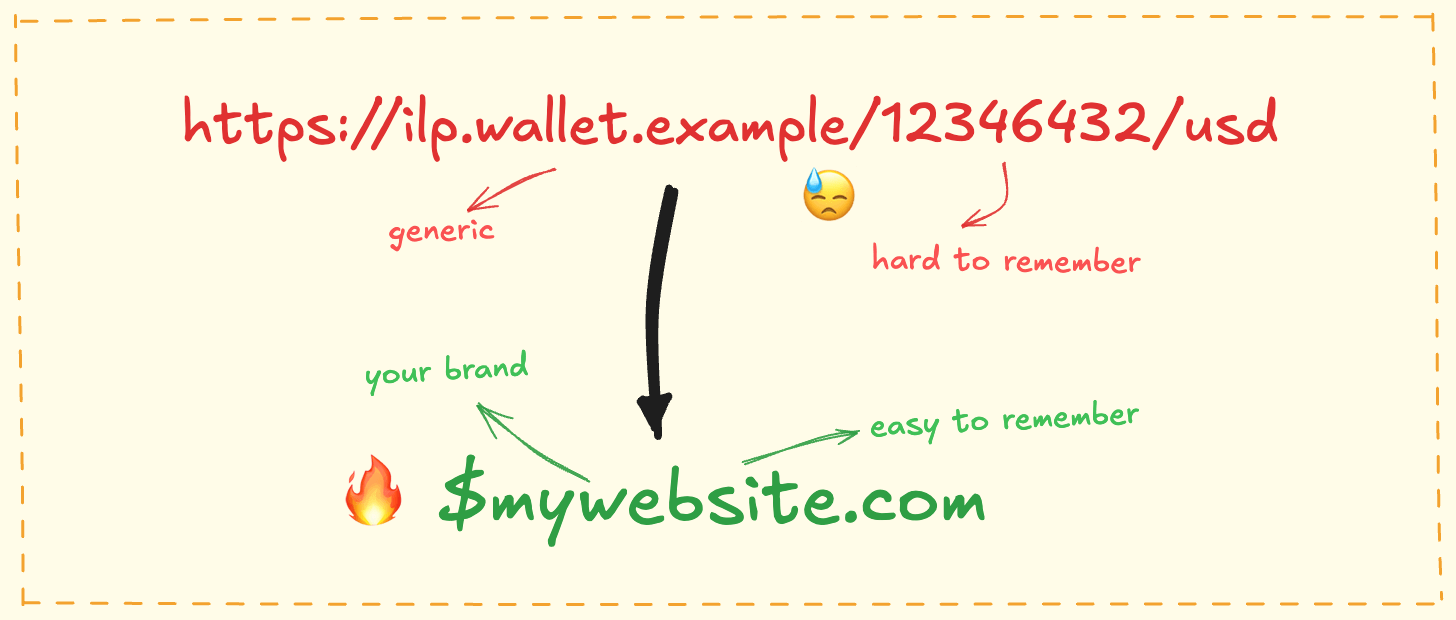
You can change the underlying wallet without having to share a new address. Not to forget the advantages of branding and the trust that comes with it, as people will know that this is your wallet attached to your online identity - your domain. The Web Monetization extension also supports these custom wallet addresses.
I personally use $sidvishnoi.com (which maps to my GateHub wallet). Feel free to send me money now that you remember the address!
Alright, so how do we get that address?
Set up custom payment pointer domain
Having a domain is a must-have for this to work. If you don’t own one, you can use a subdomain provided by your web hosting provider, but your own domain is better.
I’ll share a few approaches in this article, and later explain how these custom addresses relate to Web Monetization. The essential part in each approach is to have https://{yourdomain.com}/.well-known/pay to either redirect or rewrite to the wallet address you want to alias.
Configure in web host
If your web hosting provider allows custom URL redirects or rewrites, you can use this approach. It’s the easiest to maintain and set up, requiring no coding.
Cloudflare
For instance, let’s consider Cloudflare. They have a concept of “rules” that execute specific actions when a request (or URL) satisfies certain conditions. For simplicity, we will utilize what they refer to as a “page rule”.
- Access your website in the Cloudflare dashboard.
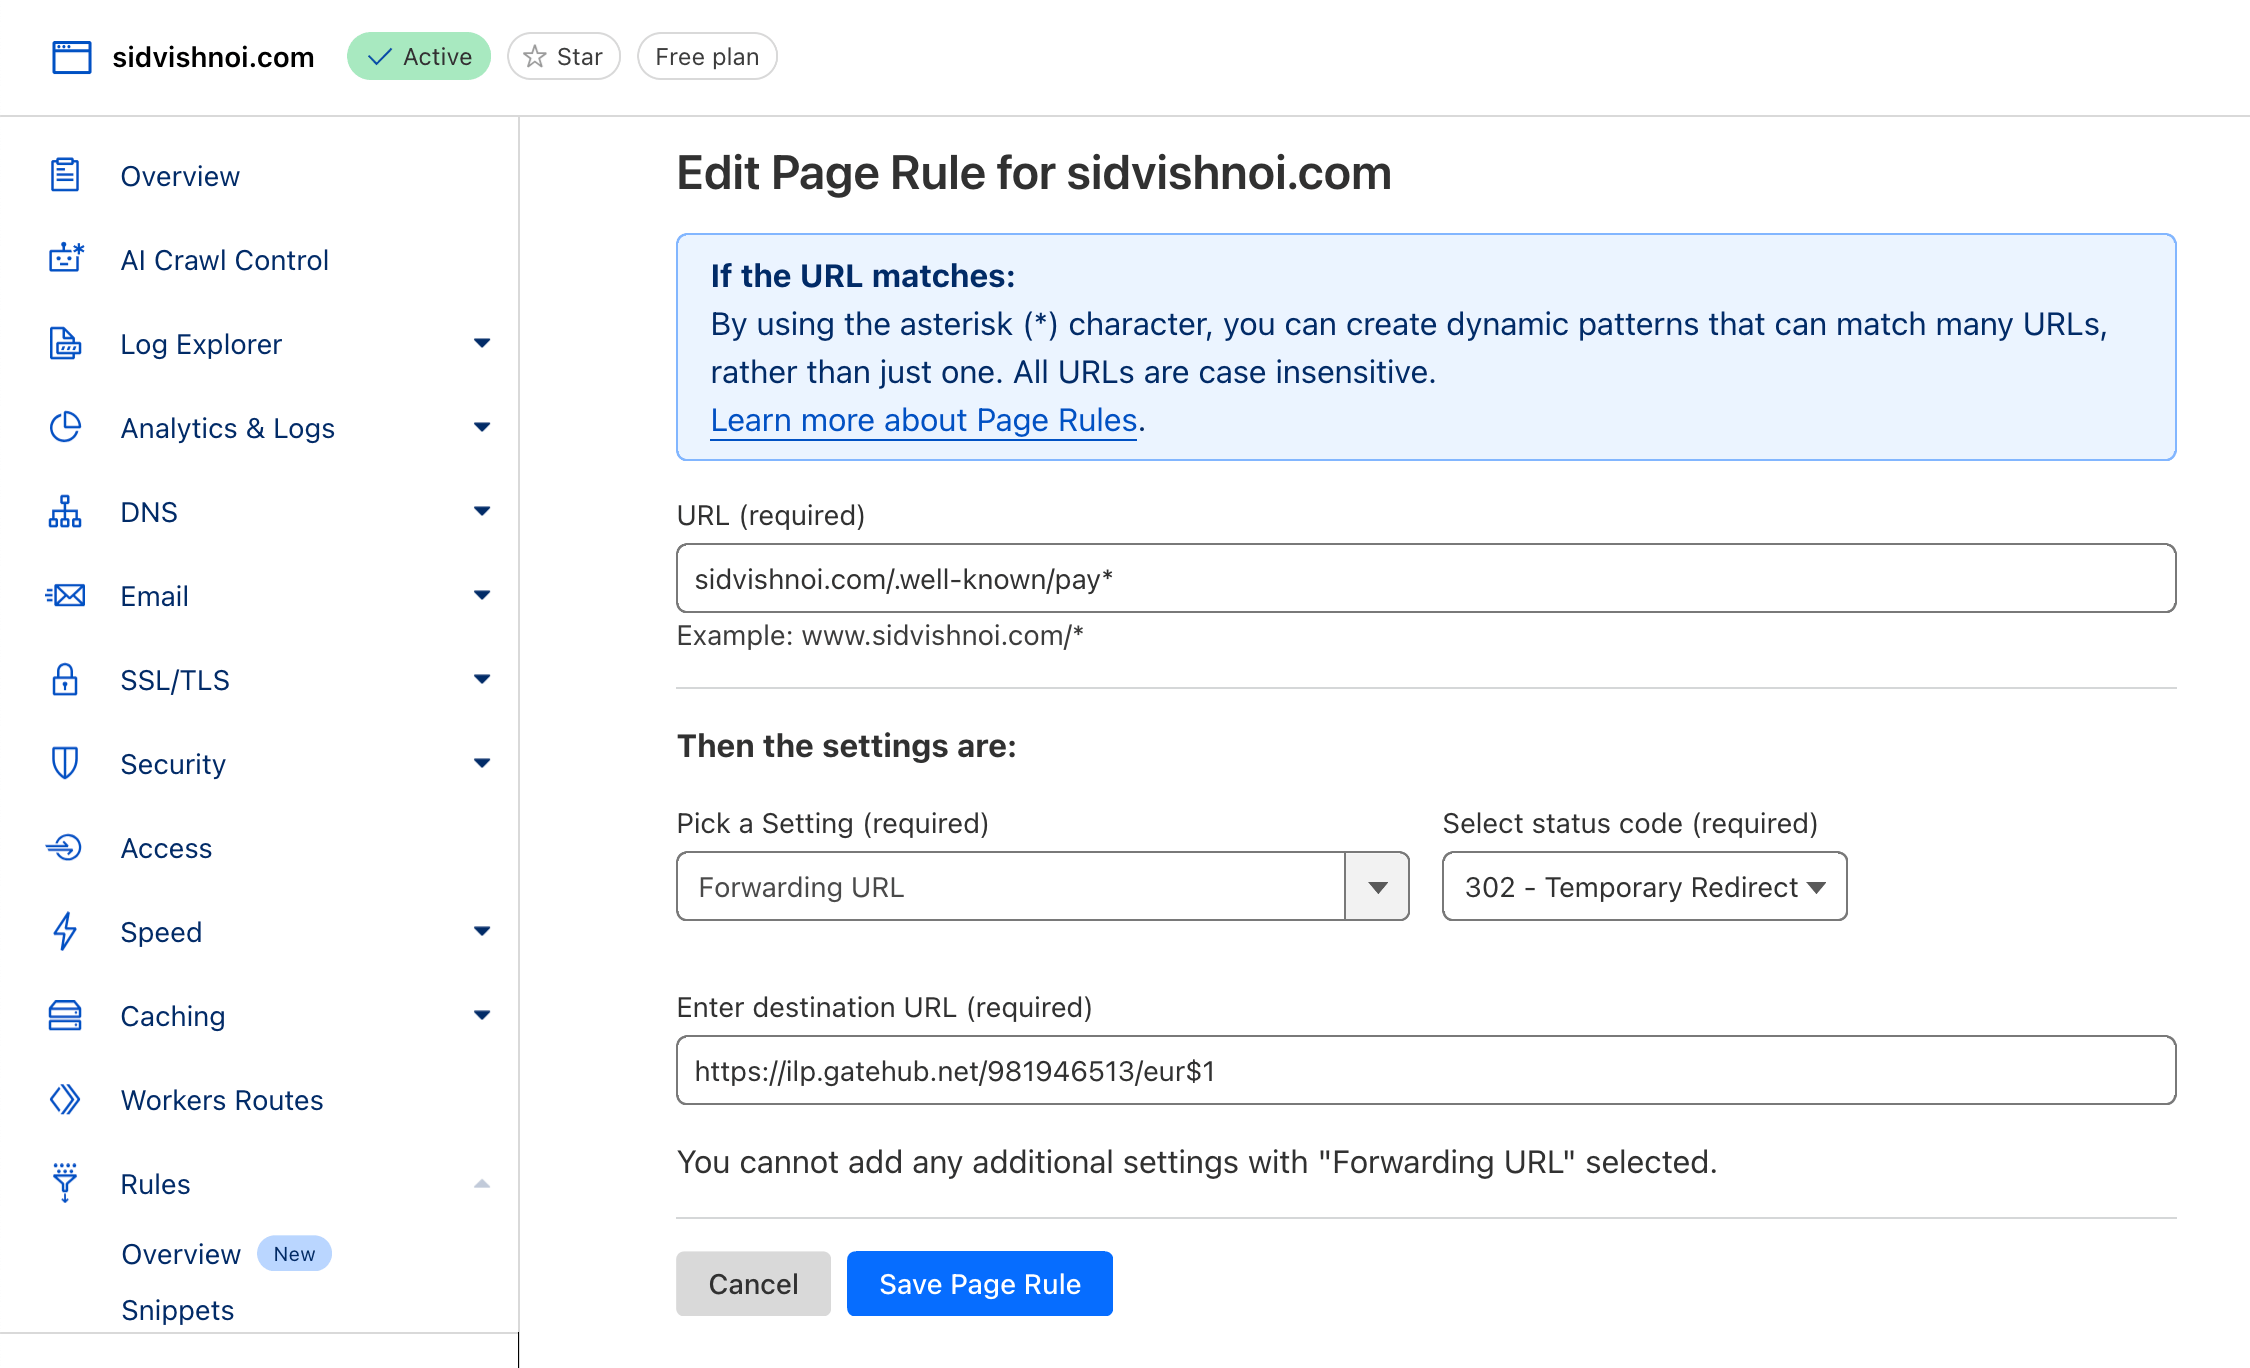
- Go to the Rules section in the sidebar and create a new Page rule.
- In the URL field, enter
{yourdomain.com}/.well-known/pay*. - In settings, select “Forwarding URL” with a 302 - Temporary Redirect.
- In the Destination URL field, write the wallet address your wallet provider gave and type
$1at the end.
E.g., if your wallet address ishttps://ilp.wallet.com/abc/zyz, enterhttps://ilp.wallet.com/abc/xyz$1.
The$1gets replaced by whatever content was there in place of*:/.well-known/pay/jwks.jsonwill become/abc/xyz/jwks.json;/.well-known/pay/will become/abc/xyz/. - Click Save Page Rule, and you’re ready.
There’s a small catch, though. If there are tools that retrieve your payment pointer contents on the client side (for instance, Web Monetization Publisher tools), you’ll need to ensure that your wallet address is set up to enable cross-origin requests, otherwise those tools may fail with a CORS error. No worries, we can easily add a new rule that lets any website access our wallet address directly from the client side.
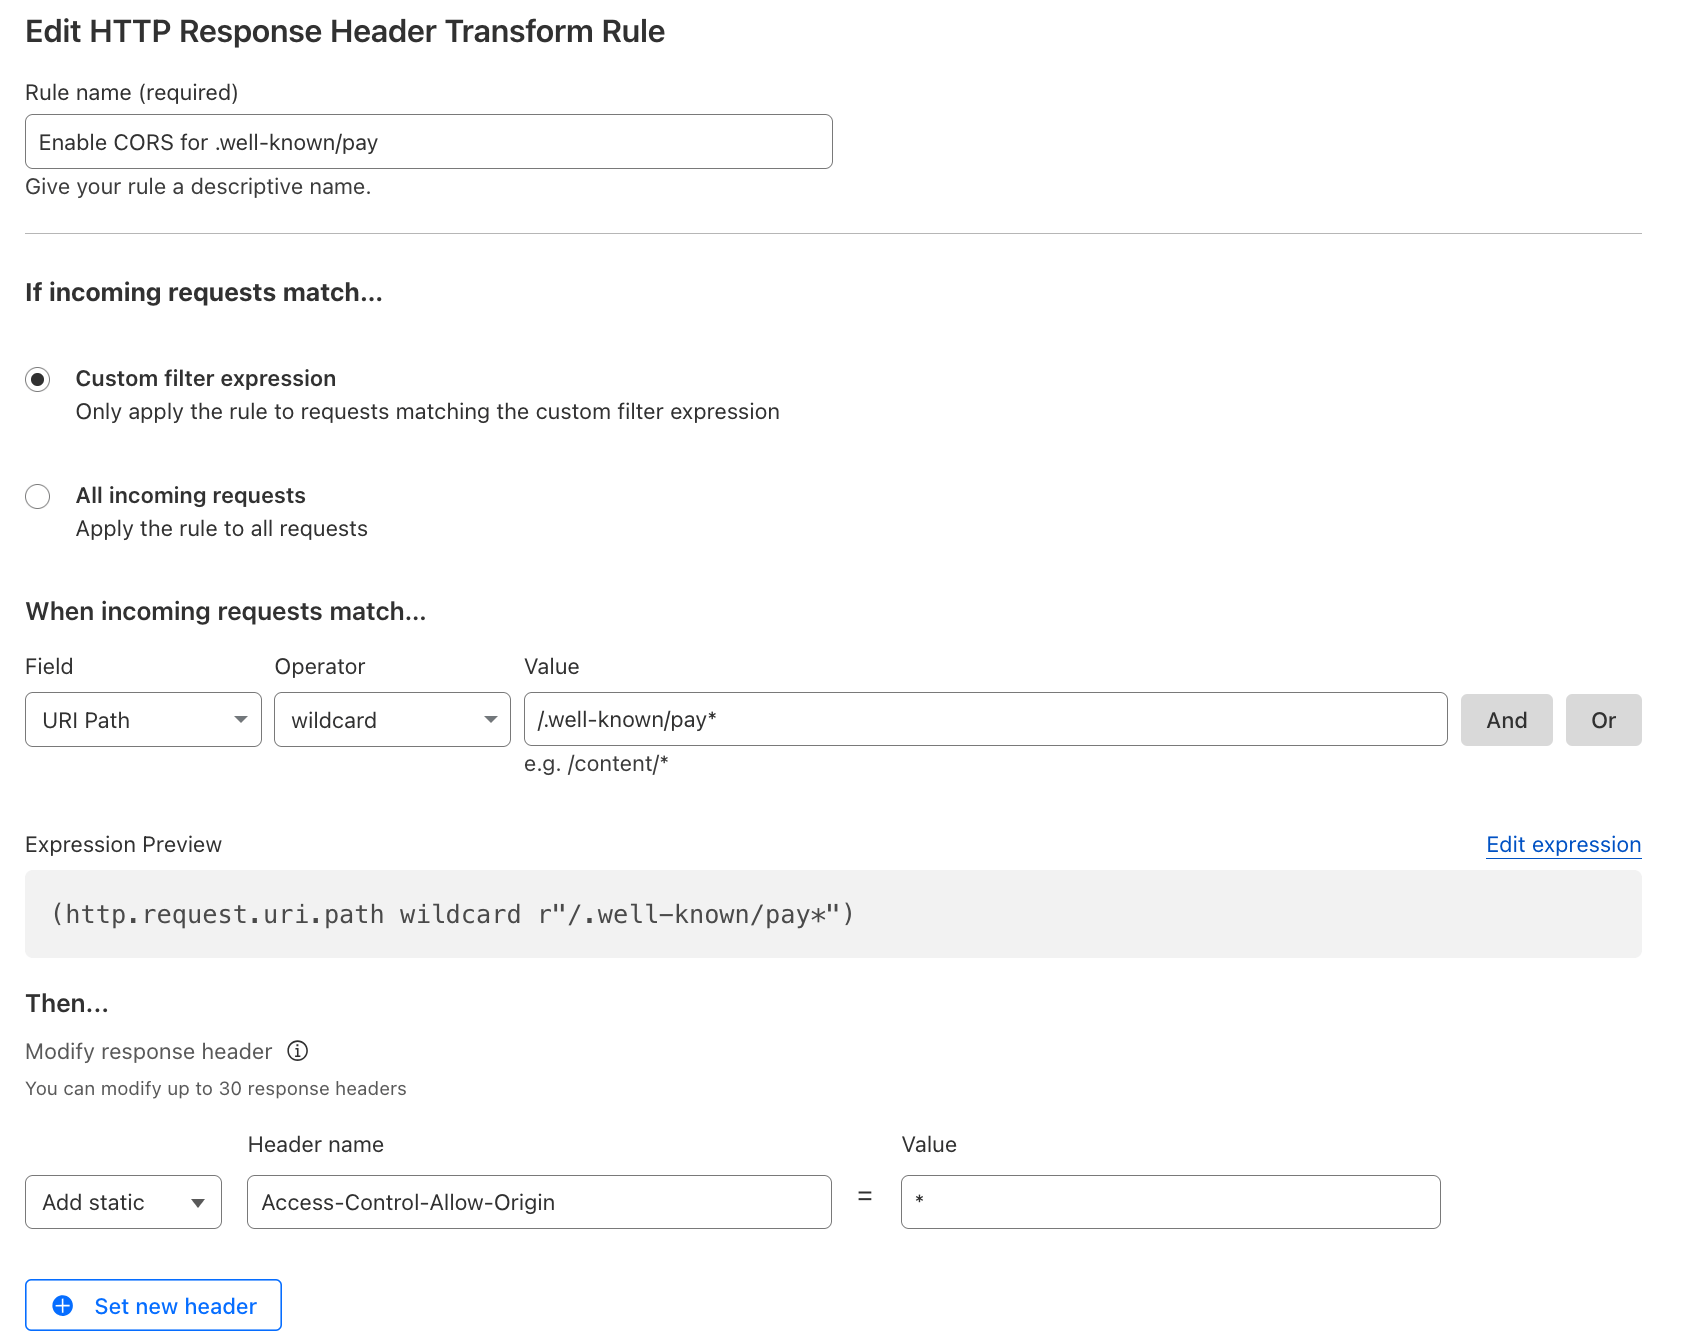
- In the Rules section of Cloudflare dashboard, create a new Transform rule.
- Use anything in the Rule name, say, “Enable CORS for wallet address”
- Choose a custom filter expression for the incoming request:
Field: URI Path
Operator: wildcard
Value:/.well-known/pay* - Then, modify the response header:
Header name:Access-Control-Allow-Origin
Value:* - Save. Now, this will enable CORS for your wallet address on any website.
NGINX
With a server using NGINX, the configuration is straightforward:
location ~ /.well-known/pay(.*) { add_header Access-Control-Allow-Origin *; # enable cors return 302 https://ilp.wallet.com/abc/xyz$1; # do a 302 redirect to original wallet address}You get the idea.
_redirects file
Some providers, especially those that host static websites, support a _redirects file where you can create a mapping of URL redirects. There’s also a companion _headers file in some providers, which is particularly practical for enabling CORS support.
Static sites hosted on platforms like Netlify and Cloudflare can utilize this approach. It’s important to ensure that the _redirects and _headers files are located in the top-level of your build directory. Depending on your static site generator, you may need to place these files in the “public” folder of your site’s source code.
# _redirects/.well-known/pay https://ilp.wallet.com/abc/xyz 302/.well-known/pay/jwks.json https://ilp.wallet.com/abc/xyz/jwks.json 302# _headers/.well-known/pay* Access-Control-Allow-Origin: *Other providers like Surge and Vercel may have their own syntax for the redirects file.
Dynamic rewrite/redirect from website
If you have complete control over your website’s routes, you’ll get the best results. Instead of redirecting, you can use rewrites. This way, the people directly visiting your wallet address won’t see the URL in the address bar change to your original wallet address. I’ll share a few examples.
Node.js / Express
const WALLET_ADDRESS = 'https://ilp.wallet.com/abc/xyz';
app.get('/.well-known/pay', (req, res) => {  const json = await fetch(WALLET_ADDRESS).then(r => r.json())  res.json(json)})app.options('/.well-known/pay', (req, res) => {  res.set('Access-Control-Allow-Origin', '*')})
app.get('/.well-known/pay/jwks.json', (req, res) => {  res.redirect(302, `${WALLET_ADDRESS}/jwks.json`)});
Cloudflare Workers
Even if you don’t host your entire website on Cloudflare, you can create a worker there (using your domain or subdomain), just for the custom wallet address.
const WALLET_ADDRESS = 'https://ilp.wallet.com/abc/xyz'
export default {  async fetch(request) {    const url = new URL(req.url)    if (url.pathname === '/.well-known/pay') {      const json = await fetch(WALLET_ADDRESS).then((r) => r.json())      return Response.json(json)    }    // ... handle other requests, or by default, return error    // return new Response('not found', { status: 404 })  }}
Wordpress
While you can write some PHP code for this functionality, I would recommend using an existing plugin to manage redirects and rewrites. The redirection plugin can be a good option. Their docs should guide you well.
Static website
If you only have a static website and are stuck with a hosting provider that doesn’t allow customizations like mentioned above (e.g., GitHub Pages), you can still have a custom payment pointer, but there might be some limitations.
You cannot have $mywebsite.com, but $mywebsite.com/pay.json may work. It might be better or worse than what your wallet provider gave you.
In case you’re wondering, no, the http-equiv HTML meta tag based redirect won’t work. The redirects have to be at HTTP-level.
-
Grab the JSON response for your original wallet address.
You can use online services like https://jsonviewer.stack.hu or https://hoppscotch.io to view the JSON response, or usecurlif you’re into those things.
Opening the wallet address URL directly in your browser may not show you the JSON response, as some wallets use it as a landing page for others to send you money. -
Create a
pay.jsonfile (or use any other name, it just needs to have the.jsonextension), and paste in the above JSON. For example:Terminal window # for example, with curl$ curl -sSL -H 'Accept: application/json' 'https://ilp.gatehub.net/981946513/eur' > pay.json$ cat pay.json# {"id":"https://ilp.gatehub.net/981946513/eur","publicName":"981946513","assetCode":"EUR","assetScale":2,"authServer":"https://rafiki.gatehub.net","resourceServer":"https://ilp.gatehub.net"} -
Deploy your static site.
Note that, given the lack of control over headers, you may face CORS issues as explained above, but it’ll work with most other Open Payment uses.
More importantly, you will have to ensure the content of your pay.json matches the JSON response that was received from your original wallet address, in case the response changes in future.
How does it work with Web Monetization
The <link> element
A payment pointer, such as $mywebsite.com, is convenient for many purposes. However, when you want to add your wallet address to your website as a Web Monetization receiver, you need to convert that payment pointer to the Open Payments “wallet address” format for use with the <link> tag (why?). Slightly disappointing, but hey, you only need to do this once.
You can use the link tag generator to convert the payment pointer to a valid link tag.
If you’re using the same domain as your website, you can use the link element’s URL resolution by writing the <link> tag like following:
<link rel="monetization" href="/.well-known/pay" />Aside: During local development (i.e. with localhost or custom dev domain), if you have the Web Monetization browser extension installed and are using a CDN or host-level configuration, the extension won’t resolve to your actual wallet address. No real money will be sent during regular website development, which can be very handy. And when you want to actually test Web Monetization integrations, you can resolve the URL to a different test wallet address.
Usage in extension
The Web Monetization browser extension allows you to use any payment pointer or wallet address to connect your wallet as a sender. This means using a custom, branded payment pointer works the same as using your wallet’s address directly. So, feel free to use your branded payment pointer there as well!
Once you’ve connected using your custom payment pointer, the extension will show you both the custom payment pointer and the corresponding original wallet address on the Settings screen.
Aside: The Web Monetization API doesn’t inform websites which wallet address was used by the sender, so websites cannot directly correlate the payments to your identity (your domain name). The website’s wallet may display information about the sender, but the wallet itself will only know of the original Open Payments wallet address, not your custom alias.
MonetizationEvent
When we add such an aliased wallet address to our website, there’s an indirection involved. This sort of indirection can also arise from using the probabilistic revenue sharing generator. The wallet itself can provide a wallet address alias, for example, as it’s shorter or promotes the brand better.
When a monetization event is emitted, how do we know what wallet address was actually paid? And how do we know what wallet address we originally provided? This is even more relevant if your webpage includes multiple monetization link tags.
Thankfully, the MonetizationEvent includes both these details:
interface MonetizationEvent : Event { readonly attribute MonetizationCurrencyAmount amountSent; readonly attribute USVString paymentPointer; readonly attribute USVString? incomingPayment; // other details not relevant in this context}Here, paymentPointer is the resolved wallet address that was paid. For example, with a custom domain payment pointer - like I’ve mapped $sidvishnoi.com to resolve to my GateHub wallet address (https://ilp.gatehub.net/981946513/eur) above - the paymentPointer will resolve to my GateHub address. When using a wallet address from the probabilistic revenue sharing tool, it’ll correspond to the wallet address that was chosen randomly.
And how do we get the original wallet address?
If you look closely, the MonetizationEvent inherits the Event interface. So, everything that belongs to Event is also part of MonetizationEvent. The part we’re looking for here is the event’s target attribute. This target corresponds to the <link rel="monetization"> element where you added your wallet address. The link element has the href attribute, which corresponds to the original wallet address we provided on our page. We can get the original wallet address as follows:
<html> <head> <link rel="monetization" href="https://sidvishnoi.com/.well-known/pay" /> </head></html>window.addEventListener('monetization', (event) => { const linkElement: HTMLLinkElement = event.target const originalWalletAddress = linkElement.href // -> https://sidvishnoi.com/.well-known/pay
const walletAddressThatGotPaid = event.paymentPointer // -> https://ilp.gatehub.net/981946513/eur})Depending on the use case, you may care about either or both of the wallet addresses. I hope it was helpful for you to know how to get each.
Closing words
I’m excited to see your wallet addresses on your own domains! It would be wonderful if you could share your solutions for different hosting providers and servers with our community, or even better, on your own blog. Looking forward to your contributions!
As we are open source, you can easily check our work on GitHub. If the work mentioned here inspired you, we welcome your contributions. You can join our community slack or participate in the next community call, which takes place each second Wednesday of the month.
If you want to stay updated with all open opportunities and news from the Interledger Foundation, you can subscribe to our newsletter.